
Disclaimer: As an Amazon affiliate, I may earn a small percentage from qualifying purchases. This is at no extra cost to you. Learn more here.
Here’s everything you need to know about how to operate a metal lathe machine manually.
Many industries use lathes for manufacturing wood or metal products. At first glance, this cutting tool can seem complicated and dangerous.
With the proper guide, however, a beginner can safely and successfully produce quality materials in no time.
Key Takeaways
- It’s recommended that beginners start with a manual lathe for better control while they work on their material.
- Various types of lathes operate depending on their size and compatibility with different workpieces.
- Despite having various types, lathes generally have similar functioning parts, which may differ in shape or location depending on their manufacturer.
- It’s essential to keep the entire machine clean and adequately maintained to ensure that it performs well and keeps you safe during operation.
- A manual lathe is an affordable way of shaping pieces, while a CNC machine is a faster and more efficient way of doing this process on an industrial scale.
How to Operate a Metal Lathe Machine Manually: Step-By-Step Guide
Learning how to use a new machine can be overwhelming. However, given the right cutting tools, material, and constant practice, you should be able to learn how to use lathes in no time.
If you’ve been searching for tips on operating a lathe without CNC control, your search is over!
Here’s a step-by-step guide on how to manually operate a metal lathe machine.
1. Start Your Machine Tool
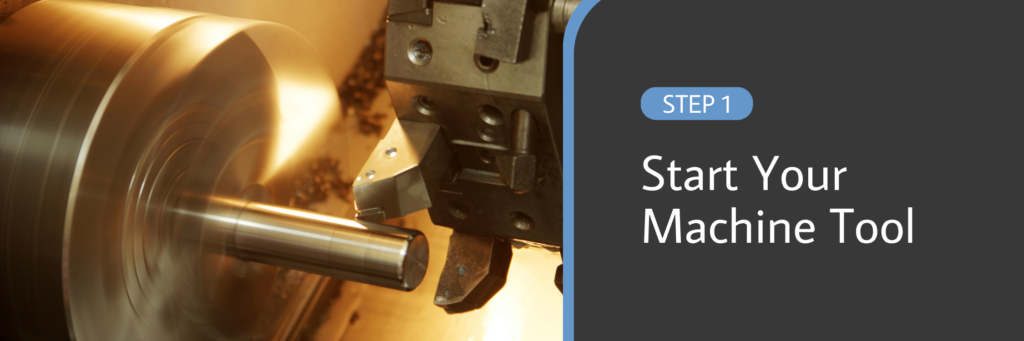
Before working with any material, it’s essential to warm up your lathe, especially if it’s been sitting overnight. Add lubricant to your machine to prepare it for your operation.
Then, set your machine’s revolutions per minute (RPMs) to around 1,000 before starting your spindle. You can also start at a slower speed and slowly raise it to 1,000 during the first few minutes.
Let your spindle run for about 10 minutes. It will allow your machine to distribute the oil to different parts of your lathe.
While it’s warming up, you can get started on the next step. You will go back to your tool’s speed later on when you’re already cutting or drilling into your work piece.
2. Set The Jaws and Cutting Tool

Using Allen wrenches, you will need to remove the old jaws on the chuck. You would usually have 3 or 4 jaws, though it varies with the different lathes manufacturers. Simply slide them out and replace them with new ones.
Then, tighten your replacements after sliding them into the chuck. Make sure you choose the correct size for your jaws. You may need smaller or bigger jaws, depending on your work piece.
Lastly, set your tool block with the tool holder onto the tool post. Ensure it has a proper alignment to the tool bit, guiding it to your workpiece while operating.
Search for the spot in your tool post that can hold your cutting tool. Insert your tool and tighten the tool post in place.
You can also insert other tools, like a boring bar or different drills into your tailstock. It will help you when drilling holes or boring into the inner dimension of your material.
This step will require you to insert the drilling chuck into the tool bit of your tailstock. It will hold your tool while the lathe drills into your workpiece.
Most tools that involve cutting have removable inserts. It allows them to cut along the z-axis of your material. Place your cutting tools properly into the tool bit, especially if working with more than one axis.
3. Place The Material According to the Dead Center

Place your workpiece onto your chuck jaws. You’ll usually work on your material while it’s flat using the dead center between the headstock and tailstock. However, this may change later on, depending on your project.
Lock the chuck jaws using the chuck key to keep the material securely in place, especially when your cutting tool is working through it.
It will help hold your material in the proper alignment while using your cutting tool, which is especially important when working with a metal workpiece. It can also help when cutting or sanding a wood workpiece.
For harder tooling, you may need to have a faster RPM. Increasing the speed will ensure that your cutting tool will have enough power to go through your material.
The speed would usually depend on what’s in your tool bit and the size of your workpiece.
You can use a dial indicator to help you check if the live center is the same. You can quickly re-adjust your jaws and material onto the center if there’s a difference.
4. Start Your Cycle

Bring your cutting tool close to your workpiece before starting the spindle. Rotate your workpiece while your tool is cutting to help the spindle.
Continue guiding your workpiece as it spins on its axis. While it might not be at dead center while it turns on the axis of the tailstock and headstock, it’s still important to guide the workpiece to its flat position.
SAFETY TIP: Wear gloves, especially when cutting and sanding wood or metal, to prevent injury from your sharp cutting tools or chips.
As you progress on your workpiece, reset the measuring device on your way back to zero. It’s applied to the tool post or the measuring wheel on your tailstock.
By resetting for tooling, you’re making it easier for the lathe to cut multiple pieces as the workpiece spins on the axis.
The cuts and dimensions on the surface of the workpiece become more consistent when you reset.
It also works as a reference point if you’re tooling more than one workpiece. You may have to remove the workpiece using the live center at some point, especially as it spins on its axis and works on different dimensions.
5. Clean After Your Lathe Operation

Besides cleaning your surroundings, it’s also important to clean lathes after working on your material. Debris, like chips and dust, can be dangerous and may damage your workpiece if you continue to another cycle.
Clean the lathe using compressed air. Make sure you get between the tool bit, the jaws, and any other material that can trap debris. You can also check your tool holder to ensure it’s still in the proper place.
Now’s also the best time to add lubricant to your tool post, jaws, and lead screw as needed. Re-adjust your jaws if necessary, especially if you need to move your workpiece out of the center.
PRO-TIP: Adding lubricant to the different tools helps them function while keeping your metal lathe at an acceptable temperature.
Keeping your lathe clear of debris helps prevent them from getting into small crevices, especially in the tailstock and headstock.
Any vibrations can cause debris to fly about and hit your jaws, tool bit, and other small parts.
Repeat the cycle of cutting and cleaning as needed.
Types of Lathes

Lathes are generally divided into three types: engine lathes, turret lathes, and special-purpose lathes.
The engine lathe is further divided into three kinds depending on their size and the material they can handle. You’ll have to check for the swing and the length between the two centers.
Lightweight bench engine lathes have the smallest swing out of all the types. Since it can swing 10 inches or less, it can be placed on a bench or tabletop.
It can easily accomplish most machining jobs but is limited due to size.
Next are the precision tool room lathes, also known as the standard manufacturing lathes. It’s used for all the common lathe operations, handling longer workpieces than the previous type.
Lastly, there are the gap or extension-type lathes. It’s similar to the previous type. However, it can be adjusted to work with longer pieces. It allows you to increase the lathe’s swing by moving the lathe bed away from the headstock.
Turret lathes and special-purpose lathes operate to mass-produce materials and products. They can also be used to work on longer workpieces and create specialized parts for other materials and machinery.
Parts of a Lathe Machine

Your manual lathe machine is comprised of different parts. They each help with the process of manufacturing metal and wooden products. Each screw, chuck, and spindle can make a difference in your lathe’s performance.
You have parts below the machine that keeps the whole machine flat, properly elevated, and at working height.
At the bottom are the lathe legs or stands secured onto the floor. They’re usually made of cast iron, which helps them absorb the vibration from your lathe and transfer it to the ground.
On the leg is the tray or chip pan. It collects all the wood and metal chips while you’re operating the lathe. It prevents debris from landing on the machine and making a mess.
The lathe bed is the base of your metal lathe. It’s where all the other parts are mounted. It supports the ways, head and tail stock, and carriage.
These different parts are mounted onto your lathe bed to make up the entire machine.
Lathe Ways
The lathe ways comprise the upper surface mounted onto your bed. It’s how your whole machine holds the tailstock and the carriage.
It helps you fix the tool post or tool bit against your workpiece when you’re working.
You can easily slide these two parts along the lathe ways. All movement corresponds to the alignment of the headstock, which is also permanently attached on the opposite end.
Headstock
The headstock is usually attached to the left edge of the ways. Besides supporting one edge of your workpiece, it also contains the oil reservoir, the main spindle, and the gearing mechanism.
The gearing mechanism lets you change the speed of your spindle. It also transmits power to the feeding and threading mechanism. It gets power from an electric motor connected to a geared or pulley system.
The main spindle is mounted onto the headstock through bearings. It’s hardened and ground to fit the lathe holding the device. It also has a hole in the center, allowing the spindle to keep a long material workpiece.
The hole in the center of your spindle usually includes a standard Morse taper. This feature varies depending on the size of your lathe.
You can also insert many tools into your spindle. The common ones for basic operations are reamers, tapered shank drills, and a drilling chuck. The spindle nose can also have a chuck, face, or drive plate clamped on or screwed in.
The headstock is just one edge of the lathe that helps keep your workpiece flat or rotating on its axis and center while you work.
It helps with alignment to make sure that your tool is working on the correct surface of your workpiece.
Tailstock
You can find your lathe’s tailstock on the opposite end of the headstock. It supports the other edge of your work, along with the jaws, while machining between the two centers.
It keeps your workpiece flat and in place while you work.
The tailstock is mounted on the ways of the machine and can clamp down on any point along your ways.
This end supports the long tools of your lathe along with additional attachments, like chucks. It can also hold cutting tools, like taps, reamers, and drills.
The sliding spindle is operated by using the hand wheel. It’s clamped into position using a spindle clamp to assist in working
Before making any lateral adjustments, you must unclamp the sliding spindle. It allows the tailstock to move freely without damaging any lateral adjustment screw.
Carriage
The lathe’s carriage is placed in front of the bed. Its primary function is to carry and move the cutting tools, the tool post, and more, depending on your project.
Given its function, it has different parts that allow it to hold the tools used while operating the lathe. The carriage contains the following features:
- Apron: This part is a long rectangular box containing gears and feed clutches. It transmits power from the lead screw to the rest of the carriage and cross-slide.
- Saddle: This part carries and supports the cross slide and compound rest. It slides across the bed as needed.
- Lead Screw: This part is a long rod that runs across the bed to transmit power to the carriage using the gear arrangement. This part can be hand or power activated.
- Cutting Tools: These are the tools you insert into the tool holder for cutting, drilling, and other functions toward your material. They come in different shapes and sizes.
- Tool Holder, Tool Post, or Tool Bit: This part is mounted directly to the compound rest. It’s where you attach your cutting tools while operating the lathe.
- Compound Rest: This part is mounted onto the cross slide, which you can swivel or clamp at any angle. It cuts steep tapers and tips for your lathe’s center.
- Cross Slide: This part is mounted on the ways on top of the saddle. You can move it back and forth at a 90º angle to the axis of your lathe.
- Feed Reversing Lever: This part can be located on the carriage or the headstock. It can reverse the direction of your carriage and cross-slide.
Lathe Attachments
One way to maximize your lathe’s capabilities is by adding special attachments. They make the machining process easier and more efficient, especially when working with more complicated projects.
The downside of these attachments is that they may be sold separately from the lathe. It can be expensive, depending on your lathe’s attachment or manufacturer.
One of the most common attachments you can get is the rest, which provides extra support while you work. It generally works with longer workpieces, but it depends on the kind you get.
The three types of rests are:
- Steady Rest or Center Rest: This attachment supports longer pieces when you’re boring or turning them.
- Follower Rest: This attachment is fastened onto the lathe’s carriage. It helps you work with turning or threading thin and long workpieces.
- Cathead: This attachment is usually used to help your lathe hold onto smaller workpieces. It helps you work with materials that are difficult to work with because of their smaller size.
Another attachment you can look into is a tool post grinder. It fastens onto the compound rest to help with grinding, specifically when working with cylindrical workpieces.
These kinds of shapes are usually harder to work with.
A micrometer carriage stop is an attachment that helps you accurately position the lathe carriage.
Given the many tools attached to this part, the micrometer carriage stop will help you have these tools in the right place.
These are only some of the attachments which help with lathe functions. Other attachments can help you do other tasks, like milling.
Care and Maintenance of Lathes

To have lathes operating properly, you must take care of them. It’s a machine tool designed to function around the clock but should be kept in top shape for the best results.
Proper maintenance and care will not only increase productivity and efficiency at work. It also keeps you and your fellow workers safe during operation.
Lathes are also designed to function for years. Taking care of your metal lathe will ensure that you can use the same machine for many years.
Here are ways to adequately care for and maintain your lathe.
Maintain a Safe and Clean Work Environment
It would be best if you placed your lathe in an environment where it can operate safely.
Your metal lathe should be protected from excessive heat and cold conditions. Extreme environments can affect your machinery, its output, and its longevity.
Be cautious when working in hot environments to prevent the motor from overheating. For cold climates, it’s best to operate at a lower speed to lessen the pressure on your lathe.
A lathe board will help avoid accidental damage, especially when changing the chuck or loading a heavy workpiece. It also catches debris from operating your machine before it can get into the lathe ways.
Don’t use your lathe ways as a table or shelf. It’s best to keep other materials off your machine, especially when it’s running. Vibrations can cause these tools to fly off of your lathe machine.
Working on your overall environment before, during, and after you operate your lathe is an excellent practice. It helps maintain the safety and efficiency of your lathe.
Lubricate and Check Your Machine Before Operation
You must always check on the condition of your machine BEFORE working with it. It’s essential since you’ll never know when your metal lathe will have problems.
Add lubricant to your lathe ways, bearings, and feed screws before and after working with your lathe. Establishing a consistent lubricating schedule will help you stay up to speed with your machine’s condition.
Adding lubricant and oil will also help prevent rusting. It’s a common risk for humid work areas that can expose your lathe to oxidation. Rust and corrosion damage the lathe and shorten its lifespan.
Consistently adding lubricant to the smallest parts, like the lead screw, the ways, and the machine’s buttons is critical. It keeps the tool up to speed with the lathe, especially when at work.
It’s also important to check the condition of the parts, especially the smaller ones. Change the jaws of your lathe as often as possible and ensure that the tool bit isn’t rusting or damaged.
Parts that keep the workpiece centered or spinning on its axis should also be sturdy.
Once you’re done working with your metal lathe, have it covered to protect it from the elements. It will help protect your lathe, especially the small parts, like the tool post and jaws, which the elements can easily damage.
Clear Out Debris
Keeping your metal lathe free of debris is important. Sometimes, wood and metal chips can slide into tiny crevices in your device, which can damage your lathe.
Making a habit of clearing out debris and dust helps promote a safe work environment. It lets you focus on the quality of your material instead of how these chips can end up damaging your workpiece.
Some people use a compressed air hose to blow debris away. While this is an excellent and efficient idea, it can also be dangerous. Make sure you don’t force chips deeper into your machine’s build.
It’s also essential to collect any dust, especially from cast iron. This kind of dust is abrasive and can damage your metal lathe. Detach and clean your way wipes.
Sometimes, wood and metal chips can end up in the lathe chuck. Take the time to remove them to prevent other damages, especially in the small crevices of the tailstock.
Finally, you must always keep your spindle tapers clean, especially when changing your cutting tools. You can do this by wiping a clean, soft cotton cloth across the spindle tapers.
Lathe Placement
From installation to everyday use, ensuring that your lathe is transported and placed correctly is important.
Once you get your new lathe, ensure the materials are complete. That includes the smallest accessories. If any of it is missing, it’s important to contact the manufacturer.
Refer to the operator’s instructions before lifting or transporting your lathe. It would usually include instructions to maintain your lathe’s quality.
When transporting your lathe, it should be adequately leveled before operation. This helps prevent additional vibrations or wobbling when you start working on your projects.
Take note of your work area’s environment, from temperature to climate. External factors can significantly affect your machine’s performance and the outcome of your projects.
Frequently Asked Questions
You may have more questions on lathe operation.
I know how hard it is to search for information on this topic, so I’ve gathered the most commonly asked questions to help you further understand it.
What is the Difference Between a Manually Operated Lathe and CNC Lathe?
In terms of cost, CNC machining generally costs more than manual machines. The same can be said when it comes to lathe operation.
You must have a digital file containing cutting and tooling instructions when using a CNC lathe.
Since it’s automatically operated, you will rely on computer-aided design (CAD) software to get your machine working.
Once everything is set, the machine should do all the work. It’s faster, more efficient, provides consistent results, and lessens human labor.
On the other hand, using a manual lathe is as simple as working other traditional machines, like bandsaws, grinders, and more.
A machinist can easily create prototyping materials for various purposes. These additional steps require extra attention and time to get the best results.
It’s more affordable and great for creating metal shapes, which is why some people still choose it.
Can a CNC Lathe Be Used Manually?
Usually, CNC machining is left to your technology. Once you’ve programmed the instructions, it should do the job.
However, some machines provide the benefits of a manual lathe and a CNC lathe. These combination lathes operate depending on how you program them.
Search for the Manual Data Input (MDI) mode. This function will allow the CNC machine to act like a standard machine tool.
Once you’ve accessed this mode, follow the standard manual lathe procedures.
This function may depend on the manufacturer’s design. It generally allows the machinist to have more control over the device. It’s best for professionals looking for a mix of efficiency and attention to detail.
What Are the 10 Basic Lathe Operations Used in Lathe?
A lathe is a machine tool that’s capable of many operations. A few basic operations allow the lathe to do these when drilling and shaping pieces.
You can make most tools using these operations, allowing you to practice and understand how lathes operate.
A lathe machine can do the following:
- Drilling – It’s the process of making a standard-sized hole in your workpiece using a drill held by the tail stock spindle.
- Boring – It’s when you enlarge a drilled hole by using a boring tool that is fitted onto a boring bar and held by the tail stock spindle.
- Reaming – It’s finishing a drilled hole to a more accurate dimension using a reamer tool held by the tail stock spindle.
- Turning – It’s when you remove material from your cylindrical workpiece’s outside diameter to obtain the desired or finished diameter.
- Taper Turning – It’s when you divide the entire length of your workpiece to create steps, resulting in a conical shape.
- Facing – It’s machining the ends of a workpiece using a cutting tool to create a smoother surface.
- Knurling – It’s when you produce a rough surface on your workpiece by embossing a diamond-shaped pattern to give it a gripping surface.
- Parting Off – It’s cutting your metal into two parts using a parting tool.
- Thread Cutting – It’s when you cut your workpiece’s internal and external threads using a threading tool.
- Grooving – It’s cutting a cylindrical surface into an arrow shape using a grooving tool held by the tool bit at the tail stock spindle.
These are only the basics that can help you get started with making tools. You can search for more ways to work with the entire machine as you progress to a more difficult workpiece.
Conclusion
This has been a full tutorial on how to operate a metal lathe machine manually. Operating a metal lathe includes working with numerous drilling and cutting tools to get the best results for their workpiece. Since it works with a cutter, you’d need to stay safe.
Keep practicing so you can work on a more difficult workpiece or project.