
Disclaimer: As an Amazon affiliate, I may earn a small percentage from qualifying purchases. This is at no extra cost to you. Learn more here.
Last Updated on May 31, 2025 by Larry Edwards
Most likely, you’ve come here because you’re considering replacing your current one with a high-quality Quick Change Tool Post (QCTP) available on the market.
There are always problems concerning machine tools and accessories for many beginning amateurs and practitioners of machining.
However, most customers know that a collection of tools called a QCTP, which can take the place of the conventional tool post, can considerably boost your work efficiency.
On this page, I’ll go over several details that start with QCTP, such as how they function and which QCTP is suitable for lathe machines.
Key Takeaways:
- Using QCTP avoids the time-consuming process of shimming cutting tools to the necessary height.
- Once the height is determined, the tool holder and tool can be withdrawn with confidence that they will be precisely repositioned when replaced.
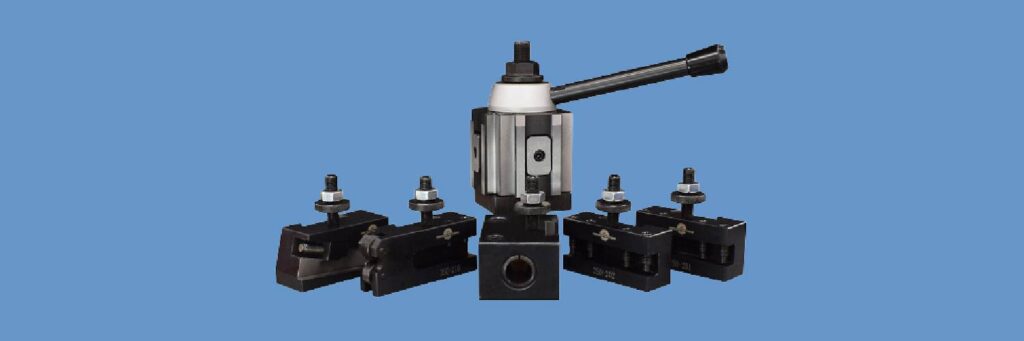
- Cutting tools are held in place by tool posts. These posts enable you to quickly change your machine tools and accessories and provide a high level of position repeatability and indexing.
- Several businesses produce QCTP, with Aloris being the most well-known and priciest. Phase II was the first to import a copy of the Aloris from China.
What Exactly Is a Quick Change Tool Post (QCTP)?

Changing machine tools and accessories is a headache because you have to shim the lathe tool to get it up to the centerline of the workpiece, which is where you always want it to be.
A QCTP, also known as a quick change tool post, is the SOLUTION to this problem!
Consider the Quick Change Tool Post as fitting your lathe like a gun that accepts clips instead of a gun where each round must be manually loaded one at a time with the hassle.
The newly purchased tool post may occasionally need to be machined. Additionally, be certain of your lathe’s ideal Quick Change Tool Post size.
There are several common sizes (so the holders will interchange). The exciting undertaking of creating a Quick Change Tool Post from scratch is another option.
A bad QCT or Quick Change Toolset selection could hurt the machining process.
I suggest piston-type tool posts to individuals who perform less demanding machining operations to save money.
The bigger your tool post, the more possibilities you have for your machining task. Pick the LARGER Quick Change Tool Post set when your lathe can accept two sizes.
NOTE: A wedge-type tool post is typically thought to hold tool holders more securely than a piston-type. However, the piston-type tool post is quite a bit more expensive than the wedge-type tool post.
How Does a Quick Change Tool Post Work?

Before I move on, let me clear up a few things. A Quick Change Tool Post alone CANNOT cut anything.
A tool holder or other cutting tools and accessories must be placed there before being mounted.
It would help if you had a lot of Quick Change Tool holders to make your QCPT functional and to be able to replace items quickly.
Whatever you decide to buy, you’ll mount it into your Quick Change Tool holder so that you can rapidly switch it on and off of your QCPT.
You’ll want to confirm that the QCPT, available in various sizes, including OXA, AXA, BXA, and CXA, is the correct size for your lathe.
Make sure that all the holders you buy MATCH the size of the tool post once you’ve decided on it.
- Therefore, if you have a CXA tool post, you can only buy quick-change tool holders that are CXA-sized.
- The majority of this tooling then comes in BXA or CXA sizing, which refers to the size of the shank.
However, all you need to check is that any machine tools and accessories you buy will fit in the T-slot in your Quick Change Tool holders.
5 Best Quick Change Tool Posts for Your Lathe Machine
It is possible to purchase the tool post or holders separately, but on this page, I’ll focus on sets that come with various holders.
If you want to purchase a wedge-type or piston-type tool post and tool holder for your lathe, I’ll discuss some of the best options so you can choose the right product for you.
1. All Industrial Quick Change Tool Posts: AXA Style

This full set is pricey but well-manufactured compared to other Piston tool posts. The range of the Wedge type is very similar.
This piston-type tool post set is comparable to Aloris because it is so good for its pricing. However, one issue with this one is that the T-slot is too large for most 10 to 12-inch lathes.
So, to set this, you might need the assistance of a milling machine.
Make a comparison with the Wedge design below before choosing. However, if I had the choice, I would have chosen the Wedge.
2. All Industrial Wedge Type Tool Post Set: AXA Style

Choose an AXA if your lathe swing is between 9 and 12 inches. Choose the BXA style if your lathe swing is 12″.
The USA tool supply firm All Industrial is excellent for finding metal lathe consumables. As seen in the picture above, this one comes with 6 tools, including the holders.
They are simple to set up on a machine, bench, or turret lathe and can be used for various tasks.
The set will contain 1 piece of each below, and the numbers are:
- It is the main tool post: 0250-0111
- Style 1 is for boring and facing: 0250-0101
- Also, for boring turning and facing: 0250-0102
- It is for heavy-duty boring: 0250-0104
- For universal parting blade: 0250-0107
- Especially for knurling. Also good for facing and turning: 0250-0110
The body is FULLY steel-made!
At 160 dollars, I think this is a very good deal, as an Aloris tool post would cost you at least a hundred bucks more.
3. Generic Piston Type Tool Post Set: BXA Style
I think you will be quite satisfied with the quality and general design of the tool holder of this tool post. It is incredibly convenient and simple to use!
As seen in the picture above, it features the following tools:
- No. 1 Turning & Tool Holder with 1/4-5/8″ Tool Capacity
- No. 2 Boring, Turning & Facing Holder with 1/4-5/8″ Tool Capacity
- No. 4 Boring Bar Tool Holder with 3/4 & 1″ capacity
- No. 7 Universal Parting Blade Tool Holder with 11/16″ blade height
- No. 10 Knurling, Turning & Facing Holder 1/4-5/8″
The BXA style can accept a 3/4-inch boring bar and is rated for lathes from 10 to 15 inches. You can extend the hole in the bottom plate to make the BXA unit fit over the original stud.
The cut end of the 5/8″ bolt should then be drilled and tapped to match the metric thread on the mounting stud.
4. LLDSIMEX Wedge Type Quick Change Tool Post: OXA Style

LLDSIMEX is the firm that makes its product consistently across all other OXA tools.
The quick-change design of this OXA Wedge Type Quick Change Tool Post makes it simple to switch out tools and accessories while working on a project.
It provides a competitive edge at work and decreases downtime by saving valuable time.
The tool solves shim-related issues that cause errors and steel waste when cutting on various lathes.
Positive rigidity and the addition of robust inner settings give this product an unmatched edge over its rivals who don’t offer such high-level precise engineering.
It is extremely adaptable and may be used with any swing mini-lathe tool holder from 6″ to 9″ in diameter!
Each time you use it, it will enhance your job WITHOUT sacrificing precision!
5. Accusize Wedge Type Quick Change Tool Post: BXA Style

This one is also an All Industrial tool. BXA works best for lathe swings between 10″ and 15″.
Because it has the ability to handle a reasonably large lathe swing like the Shop Fox M1112, you could argue it’s sort of for professional metal turners.
It’s a 6-piece kit with all five tool holders for cutting tools. A number identifies the BXA tool styles.
- 250-201 is for the Turning and Facing holder
- 250-202 for Boring turning and Facing holder
- Style 4 (250-204) is for boring and heavy-duty passes
- 207 is counted as the Universal parting blade
- And last comes style 10, which is 250-210. It’s for knurling, turning, and facing holders.
You may also find the primary tool post and the XL size of style 1 in an 8-piece set, which would cost extra.
The bottom plate of the tool post may need extra machining to fit your lathe.
It is guaranteed that BXA tools will provide you with their highest level of stiffness for a chatter-free performance when operating the lathe.
Wedge vs. Piston QCTP: What Are the Types and Styles?
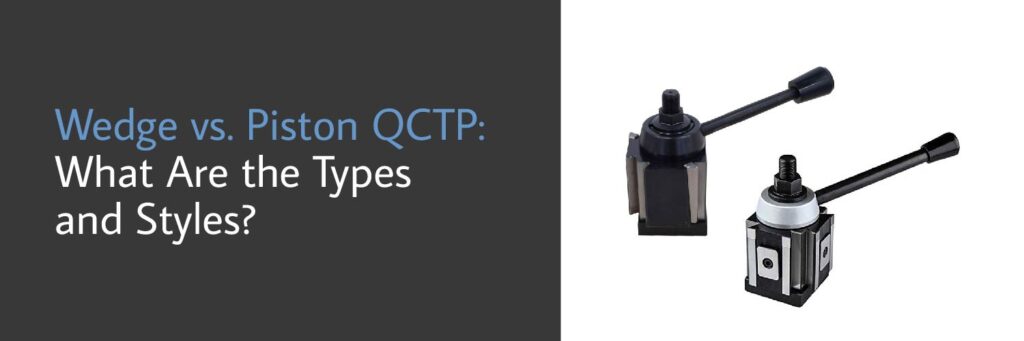
You can notice one of two different types of tools. One is known as a Wedge, and the other is a Piston.
- The WEDGE style performs better at holding the tool holder and is pricey but worthwhile.
- Although the PISTON functions properly, there are times when a strong load will cause the holder to bend downward, particularly if the tool’s point of contact is below the piston’s center.
There isn’t much difference between them unless you perform heavy work, especially for the home machinist.
Even with hard work, the material is often hogged to the finished size.
The locking mechanism is perhaps not as crucial as the QC build quality. Compared to piston-style tool posts, wedge-style tool posts have a superior grip on the tool holder.
However, compared to the Wedge type, Piston-type tool posts are more affordable. It’s a “get what you paid for” kind of tool!
If you work on less demanding tasks, you can only spend what you require. The piston kind will work well for you and be considerably less expensive.
You can set some money aside on the table.
Comparison of the AXA, BXA, and CXA Styles

The company website allows us to observe the distinctions between AXA, BXA, and CXA.
There are three widths:
- 2-1/2″
- 3″
- 3-1/2″
The height can also be the following:
- 2-1/4″
- 2-3/4″
- 3″
The CXA is only an inch higher overall. The through the rod that secures it to your compound has a diameter of:
- 9/16″ for an AXA
- 5/8″ for a BXA
- 34″ for a CXA.
Depending on the size of the through the rod in your compound rest, it might be something to consider.
The AXA ranges from 6 to 12, the BXA ranges from 10 to 15, and the CXA ranges from 13 to 18.
If you measure everything as suggested, I believe the tool posted on your lathe will proportionately match, so you might be happy with it!
The BIGGER your tool post, the MORE possibilities you have for your machining task.
For example, the maximum shank size is 0.5 inches for standard AXA style holders and 0.625 inches for BXA design.
The largest shank size for AXA and BXA can be 0.625 inches and 0.75 inches, respectively, if the XL turning and facing holder are included.
How Do You Choose the Size You Require?
The height between the top of your compound and the centerline is the FIRST factor to consider. Your lathe swing length will determine how long it is.
Discover the definition and measurement of a lathe swing. You can measure it or figure out if it’s not there or isn’t defined.
Only the lathe’s center height needs to be measured. It is the distance measured from the centerline to the lathe bed.
Now, match the swing range of the lathe with your QCTP type.
Consider having a 13″ swing that fits both BXA and CXA and install the CXA and opt for the Larger QCTP.
Now that the tool has been placed, you must angle it to understand how the tool bit sits about the center lines. Install a 3/8″ bit of high-speed steel so you can see what is happening.
You would have plenty of room to climb if you dropped it to its lowest position.
Will the bigger size of the tool post allow it to drop low enough to suit your centerline? Of course, it will!
How to Fit a Quick Change Tool Post to Your Lathe
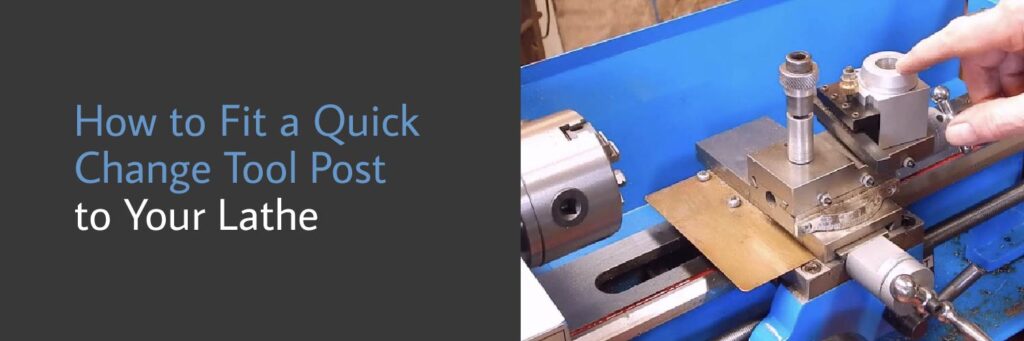
Fitting a QCTP to your lathe, in my opinion, should be done in two steps.
Part 1: Design and Making Preparations (AKA “Dark Mutterings”)
You will need to modify the toolpost stud to accommodate your chosen QCTP.
Once you’re done, the final product is probably quite a bit rigid and handier (center it once in the tool holder and forget it). Your studs can never have enough stiffness!
There are now two alternative approaches to solving this issue. A lot of people have designed a sleeve that is threaded both internally and externally.
The sleeve has threads and an outer diameter that matches the new, larger stud and screws onto the original stud.
The sleeves may be easily made on your lathe, and this approach has been employed frequently.
The best thing about this method is that it can be entirely undone if you ever wish to place the lathe back in its original position.
The bad news is that, in my opinion, sleeves will be weaker and less rigid than full-on studs, even though some highly talented hobby machinists have chosen this path and been satisfied.
Additionally, sleeving won’t work for me. For example, if I go with a sleeve, I have to think about boring the lower portion of the QCTP grip.
The alternative method would involve removing the smaller stud, boring out the hole, and tapping it for the larger stud.
Part 2: Building the Adapter Sleeve
First, turn the rod to the proper OD. Insert a center drill bit into the chuck.
I needed to drill a tiny pilot hole at the end of the rod to try turning with the live center for accuracy and support.
The workpiece was now securely supported thanks to the live center. I began trial fitting the QCTP’s detachable insert once I was reasonably near.
The carbide insert likes pretty fast spindle speeds to cut well.
TIP: One of my guidelines is to check with the part that needs to fit whenever possible without disassembling the setup.
The next step is to bore out the rod once it has been turned to the correct OD.
In the tailstock chuck, I only utilized drill bits that were TiN coated. Use a chip brush to apply oil generously.
I adjusted my belt settings before starting to slow down the spindle as well drastically. In three steps, I cut the hole.
While the rod was in the chuck, I gave it a tap with a tap wrench.
For concentricity, I would have preferred a wrench I could somehow fasten to the tailstock, but I didn’t have one, so I carefully eyeballed it instead.
I essentially threaded the entire tap in since I wanted several threads.
The threaded piece needs to be separated next. You should go quite slowly when splitting and apply oil or another lubricant/coolant.
One of the two sleeve parts is finished once the split-off ends have been cleaned up with a file.
Now that it won’t be threaded, the one still in the chuck requires a slightly larger hole. Finish the final sleeve using the same drill and part it off after drilling it to the correct ID.
A threaded rod must be fitted to the sleeve as the last step in assembling the sleeves. I used an M8-1.25 bolt and some Loctite.
I used Loctite to secure it halfway into the sleeve, secured it in a clamp, and used my air die grinder and a cutoff wheel to chop off the thread.
I ensured my lathe handle fit and used a file to polish up the end carefully.
The next step is terrifying. To fit over the boss, we must bore a sizable hole in the QCTP. It has to be greatly expanded.
I used a dial indicator and a transfer punch, just the right size for the hole.
Boring hurts. I can only say that cutting depth and speed are both very important.
Additionally, it is very challenging to properly position the boring bar in the tool holder so that it is stable and cuts well.
With the QCTP, I have significantly improved the usability of my lathe. I learned a lot and didn’t screw up too badly.
Frequently Asked Questions (FAQs)

Here are some of the most commonly asked questions about the quick change tool post and some related topics in case you can’t locate the information you’re looking for.
What Are the Three Types of Tool Posts?
There are many types of tools. Examples include:
- Quick Change Tool Posts
- Standard Tool Posts
- Lathe Tool Posts
What Is OXA Tool Post?
The Quick Change Tool Post (OXA) is a quick change tool post that fastens to the tool carriage of the Duality Lathe.
The Duality Lathe has a Quick Change tool post for manual machining tasks that fastens to the tool carriage.
How Do You Measure Swing on a Lathe?
The lathe swing indicates the largest workpiece diameter that a lathe can turn—double the distance between the middle of the spindle and the top of the bed.
The bed measurement determines the maximum length of the workpiece you can turn.
What Are the Best Tool Holders to Pick?
The gripping force at high speeds, run-out accuracy, and balance quality, which limit vibrations, are the most crucial characteristics of a tool holder.
Less than 0.003 mm of run-out accuracy is required for tool holders.
What Does the Boring Bar Do?
A metal lathe is a machine tool that rotates a part while moving a cutting tool to remove material from the part.
For example, I also increase the interior diameter of a workpiece and maybe reduce that dimension to a precise tolerance.
Note that boring bars are used on metal lathes to accomplish these tasks.
Conclusion
The tool post of almost every serious machinist is changed or upgraded at some point during their turning journey.
QCTP is currently highly popular for most customers starting in lathe machine operations.
You can continually remove a tool, replace it with another to execute machining operations and continue this process if you don’t remove your QCTP from your compound.
The tools will be restored where it was during the previous procedure. So, certainly, it is currently far too handy for machinists.
Even if you have a limited budget, I hope this page will assist you in selecting the best tools available. You can also contact the manufacturer before purchasing for more options.