Disclaimer: As an Amazon affiliate, I may earn a small percentage from qualifying purchases. This is at no extra cost to you. Learn more here.
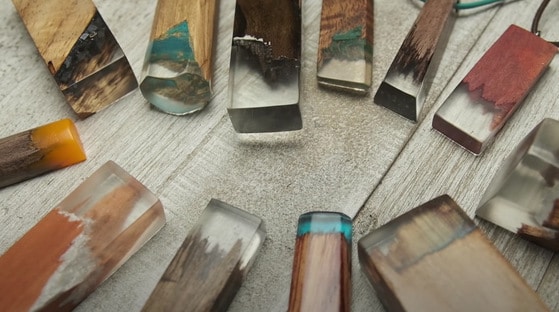
It took me a while to figure out what is actually my option for resin as I started casting over a year ago. Which cast resin would be best to use for my pen blanks or bowls?
And when talking about casting, I mean pen blanks; because usually, that’s what most people think of.
So, I searched online and started researching my way out. Since then I’ve tried polyester, then epoxy before finally moving over to polyurethane.
Now you can make things like rings, earrings, pendants, bowl blanks and etc also. But I mostly used them for pen blanks and bowls.
So, in this post, I will recommend three specific types of resins that I always use to make pen turning blanks and bowls.
Stick with me and I hope you will have all your answers regarding choosing the best resin for pen blanks, bowls or any kind of woodturning project.
What are the types of Resin?
Before moving towards the review section, let’s know a few things first to clear all the confusion about resin stuff.
So, typically or basically there are three types of Resin that we see a vast usage in woodturning.
- Polyester: First thing on the list is polyester resin. Now as I said, this was the first type of resin that I tried because it was fairly cheap and similar to epoxy. But to be honest, it wasn’t that great.
You can put pearly kind of swirly stuff in it, it’ll pretty much adhere to anything you want to put in there. But the main drawbacks are the heavily strong odor like hell and the slow cure timing. So, that’s a no-no, don’t waste your time.
- Epoxy: Epoxy‘s a type of Resin that is much stronger, much more solid. Woodturners really enjoy that, but it basically just becomes a hard plastic one time and that’s it. Not a lot of variety there. Perfect for river tables, tumbler etc.
Now epoxy doesn’t have any of those issues with a strong pungent odour. But as far as I’m concerned, they’re quite the same type of material (IMO) in the end (I know many would disagree but that’s what I felt). You just don’t have the smell when you’re dealing with it. Besides, they are far more expensive than Polyester resin.
- Polyurethane: The last on the list and the final stuff that I am and will be sticking with. Polyurethane is much more versatile. It can be a foam, it can be a rubber, it can be a hard plastic. This stuff is very versatile and perfect for pen blanks, bowl, and for anything.
Ever heard of Alumilite? That’s polyurethane. The only problem is you have to use a pressure pot to make sure to eliminate bubbles. But the biggest benefit is that the white stuff can cure fully in just under 15 to 20 minutes!
Which type is most ideal for woodturning projects?
So, the competition is between Epoxy and Polyurethane when it comes to turning pens and bowls, right? I am talking about the woodturning projects, not necessarily every woodworking project.
The two main aspects or say parameters to decide which one is best suitable than the other one are- The time of cure and the tolerance.
Let’s jump onto this now.
Epoxy Cure timing:
So, the time aspect of epoxy is pretty graphical, a pretty slow cure schedule. And that is why when you’re mixing a batch of epoxy up, you have a 35 to 40 minutes open time.
Then you have a cure time of about 24 hours. However, the full cure timing is about 5-7 days.
That could be a lot of time for a woodturner if you are not turning a large amount.
Polyurethane Cure timing:
Polyurethane is so variable. You can change and you can even manipulate things accordingly with these types of resin.
They cure really fast which is very important for a tight schedule. You will see them going really slow and then all of a sudden, it’s cured!
Or you’re going pretty steady and then really quickly it’s cured fast. That’s why I suggest it for any kind of woodturning application, not just only pens.
Because you can pour a blank, get it in the pressure pot, demold it in 90 minutes and get going. Which is not in the case of Epoxy resin.
Epoxy tolerance
Epoxy is a high heat tolerance resin. It can literally withstand heat up to one hundred and fifty degrees depending on the product. That’s the highest resilient line.
They are very durable and resistant to moisture also. Unlike others, you can work around sinks or other water sources, which you might not want to do while working with Polyurethane.
Polyurethane Tolerance
Now, Polyurethane is not as high tolerant stuff as Epoxy. You can get all the ease of using it but when it comes to durability and tolerance, you might want to think about epoxy.
Polyurethane is a little less forgiving than polyester and epoxy. That’s why you’re often going to see on the labels 1-1 by weight, or 2-1 by weight.
So, these are really very important things to consider before you choose the resin type to make your pen blanks or bowls.
Regardless of the statistics and maths, polyurethane is fairly tolerant and durable to satisfy any woodturner in the world. So, don’t get confused.
Best Resin For Pens Blanks and Bowl?
So, the best type of Resin for Pen blanks and bowls is definitely Polyurethane in every way. Now, which one should you buy with your eyes closed as you might see a number of different brands out there?
To answer this directly I would say- go with Alumilite. There are three most popular kinds of Alumilite cast resin for pen blanks specifically-
- White polyurethane Resin
- Clear Cast Resin
- Deep Pour Resin
Alumilite White Cast Resin Review
These two are the best casting Resin in the business for woodturning. I use those too for any type of casting that I do anyway. I think they cover the gamut for the most part and a lot of the other ones are kind of more specific use cases that you would need.
The Alumilite white is very fast working and you will only get two minutes to get everything done and get it in the pressure pod. It’s a totally opaque resin.
When you mix Part A and Part B it turns thick white. You can’t see through it at all and you don’t have to paint tubes. There’s absolutely no way that light could go through it.
So it’s an easy pen blank to turn because you don’t have to do extra work.
Cons of Alumilite White Resin:
The biggest drawback of this resin is that It doesn’t work with pearl X and things like that. You can’t colour it with that. I mean you can use dyes but not anything that is reflective like the pearl X.
You need the light to transmit through the stuff to get the pearly feel and effect. So you gonna have to use the Clear version of it to get it done which I’ll be talking about next.
Alumilite Clear Cast Resin Review

- Home Renovation Essential - Elevate your home renovation projects with our Amazing Clear Cast set. This epoxy resin kit transforms your furniture, bar tables, or table tops into brand new pieces with a crystal clear finish. Alumilite's Amazing Clear Cast, a high-ranking epoxy resin, is your go-to for a casting resin or clear coat.
- Crafting Made Easy - Unleash your DIY spirit with our versatile epoxy resin. Pour a protective coating or cast unique items like keychains, all with the same product. This kit allows for deep pours up to 3/8 inch thick, making it perfect for both veterans and beginners.
- Simple Mixing Process - Our crystal clear epoxy resin features a 1:1 ratio for easy mixing. This user-friendly formula ensures a smooth process, whether you're a seasoned hand at crafting or just starting out.
- Colorful Creations - Add a splash of color to your DIY projects. Our Amazing Clear Cast can be mixed with Alumilite dyes, Polycolor Powders, alcohol inks, mica powder or other non-water-based colorants. Turn your basic craft into a vibrant piece of art with this epoxy resin.
- Professional Finish - Achieve a high-gloss finish with our epoxy resin kit. This clear casting and coating system cures to a rigid, durable, and impact-resistant plastic, ensuring your projects have a professional and long-lasting look.
Last update on 2026-06-18 / Images from Amazon Product Advertising API
Now, why do we need to use the Alumilite clear also?
So that you can get pearly effects or if you need something that needs to have some transparency to it. That’s why we use two different resins.
There’s actually two different formulations of Clear Resin. They have two different curing times. The regular set is kinda the faster one, which has a 5 minutes opening time whereas the slow set has 10-12 minutes working times.
Now, if you are only doing very small amounts of resin you should probably stick with the regular set. That’s gonna work a little bit better it’s gonna cure better.
If you’re doing hybrid pen blanks, you definitely want to use the slow set. Because it’s gonna stay in that liquid form and be able to get into all the little cracks and crevices a little bit better.
Cons of Alumilite White Resin:
The drawbacks are very light that it may not even bother you to be honest.
The only drawback of the slower one is that it takes a little bit longer before you can take it out of the pressure pot. It’s 2 to 4 hours with that compared to 1 hour with the regular set.
Now, if you buy a large quantity you can get a set with the slower one to get all the advantages. For the cost savings and for the benefits that slow resin offers I think is probably the one to go for.
Amazing Deep Pour Resin by Alumilite
![Alumilite Amazing Deep Pour Epoxy [16 oz A + 8 oz B (24 Ounces) 2 Part Kit] 2 inches Thick High-Gloss & Crystal Clear Liquid Glass for Casting Countertop, Tabletop, River Tables, Resin Blanks & Wood](https://m.media-amazon.com/images/I/414w9dt5FVL._SL160_.jpg)
- POUR THICKER THAN EVER: Excited to make your projects clearer and deeper? Create your own modern rivertable with the Amazing Deep Pour. This is great for concrete project fillers that need thick layers greater than 3/8 inch.
- ADD SOME COLOR: Take your coffee table project to the next level by adding some colors! You can mix the Amazing Deep Pour with Alumilite dyes, polycolor resin powders, glow powders, and glitters.
- DEEP-CAST WITH LESS DELAYS: Deep-casting can be accomplished in less time thanks to this 2:1 mix ratio with low viscosity and reduced exotherm (heat build-up). Because of these features, you can pour thicker sections without having to layer unlike standard epoxies.
- FDA COMPLIANT FOR YOUR SAFETY: Overhaul your furniture with the Amazing Deep Pour and never be worried about using it for dine-ins. When fully cured is completely safe in contact with food or in projects involving food.
- CRYSTAL CLEAR FINISH: Got holes in your wooden furniture? Fill the gaps with the Amazing Deep Pour and give it some flair. With its self-degassing feature, you will always get crystal-clear castings whether you're making a bar top or resin blanks for lathe turning.
Last update on 2026-06-18 / Images from Amazon Product Advertising API
Don’t want to invest extra money buying pressure pot?
People pour wood blanks to turn pens, coffee scoops, wine stoppers, bowls and a ton of other things that usually need a pressure pot. The goal is to get rid of air bubbles. So that’s an extra investment to pressure pot.
Now if you want to get rid of that and want something that does the job without the pot, you can check the Amazing deep pour resin solution. Deep pour resin has such intensity with a long open time that will ensure the natural compact pressure.
So yeah, you won’t need an extra pressure pot and that means reduces of extra work.
The key thing to get the desired mixture ratio is one part hardener and then two parts of resin. So if you’re pouring 5 oz of part B, you gonna have to take 10 oz of part A, which is the resin.
These two parts are very thin. It means they’re naturally going to start to combine and not going to be separate like the regular clear cast.
Deep pours Resins usually have an open time of 60-90 minutes; tack-free time of 24-72 hours, and cure timing of 5-7 days.
You can have a great mixture without bubbles and save few hundred bucks not buying the pressure pot.
Drawbacks
The only drawback I would say is the differences in cure time. With a pressure pot, it’s going to take only a few minutes with the regular white resin. Remember you need the pot to get rid of the bubbles.
So, if money is the main concern here, you have your solution with the deep pour. But you will have to wait for like 7 days.
How much time do I have to spend mixing the resin properly?
I want you to mix in this amount about 24 ounces for at least five to six minutes. Don’t get confused with the swirls while mixing the deep pour solution. Just make sure to scrape the side and bottom part with a stick repeatedly for some time.
Important FAQ
This one is a very important question.
First of all, we need to know clearly what actually is the pressure pot is there for. The pot is basically collapsing the mixture to such a small extent so that the air does not have any space to stay. That’s how it removes the air bubbles most effectively.
So how long do you need to leave your casting inside? It depends. And it depends on two major factors.
What type of resin you’re working with? How much resin you are casting?
If you are using a very small amount of resin like a tube in a mold and using clear resin, then leave them for a longer period than any 3 pins or 6 pin blank molds.
To be more specific, if you are using anything under 100 grams then keep it there overnight just to make sure to eliminate bubbles properly. If you are pouring above 100 or 150 grams, the ideal time to leave would be 2 to 3 hours.
I am saying it for polyurethane resin. The timing on manufacturers instruction will be very minimum than that, I know. But you can leave them for 1 or 2 hours just to make sure there are no air bubbles.
Now, in case of polyester or epoxy, it’s definitely going to be an overnight process regardless the amount, due to the really long open time.
Room temperature affects the cure time. The resin needs to get hotter to cure. So, if your room temperature is below 70 then the demold time is going to be longer.
A general guideline to look for the exact number is going to be the demold time for the specific resin you’re using. You can find that on the manufacturer’s website or you can also call their technical support team to help you with that.
Anyways, if you can stay between 65 to 70 degrees, that’s going to be ideal.
Generally, if we think of resin a pen blank, we are talking about 100-150 grams of resin. However, you can also make a small pen out of anything like 30 or 35 grams of resin.
To avoid wasting, it’s quite important to know how much resin you need for your molds.
Normally people fill their molds with water to see how much resin it will take. This also works but takes extra time.
One little trick is to use Rice instead of water. Because you don’t want to have any moisture in the mold when you go to cast it.
However, the air spaces between the rice grains could detract from the accuracy. So, you may also use sand or table salt, or sugar to be a bit closer to accuracy.
You can also use an online resin calculator for rectangles or cylinders if you don’t want to memorize the formula using basic geometry.
I also like to estimate on my first cast and then weigh the casted piece after it cures to know exactly how much resin to use next time.
Now, this is kind of a video tutorial thing. You see, you understand and you do it along with the tutorial.
So you can take help from youtube as I am sure there are plenty of videos for beginning resin turners that will teach you to do that.
Start Turning Your Resin Pen Blank
I hope this guide will solve all your confusion about getting the best resin for your pen blanks and bowls. All the products I recommended here is Alumilite once again as they are so good.
There are plenty of other brands out there too, but Alumilite is kind of became the go-to resin for most of the turners these days.
So first, select what type of resin you are willing to work with. Then fill up some molds, pressure it right, and you are good to go.
Some resins like polyester contain a strong smell that can make you dizzy. So, be careful and always wear a mask and eyeglasses to ensure protection.
If you are new to woodturning and thinking of buying a new lathe or chisels or carbide turning tools, you may also find these articles helpful.
1. Recommended pen turning mini lathes
2. Woodturning chisels and gouges guide
3. Carbide cutters illustrated Guide