Disclaimer: As an Amazon affiliate, I may earn a small percentage from qualifying purchases. This is at no extra cost to you. Learn more here.
When you see the wood that has a grain running from headstock to tailstock, that’s the spindle. And, as the name suggests, you only use a spindle roughing gouge to turn out that square spindles round.
Roughing gouge is the absolute easiest to learn to use properly among all other tools. Unlike the other woodturning chisels, it’s also very easy to sharpen.
This is where you began and first learn to cut with a roughing gouge. So, I am going to guide you with all the necessary ideas about using the roughing gouges properly.
Let’s start with 6 of the best options along with my top pick. The gouges I recommended include- 1″, 2″, 3/4″, and 1-3/4″ single-piece tool.


Last update on 2026-06-18 / Images from Amazon Product Advertising API
Benefits of Buying a Roughing Gouge separately
The spindle roughing gouge is probably mostly confused with the regular spindle gouge, especially in starter sets. I am talking about gouges that come along in regular woodturning chisel sets.
Beginning woodturners sometimes find these two gouges similar, as the flute size looks quite the same. But if you look carefully, you’d see the differences in flute size, shape, and length.
So, you’d be less likely to confuse these two if you didn’t buy a set and you purchased them individually as my recommendation goes.
My top pick: Carter & Son Tools

- Tool made from M42 HSS for a razor sharp, long lasting edge.
- Made in the USA.
- Hones to a finer edge.
- 100% lifetime guarantee.
- Deep flute for easy stock removal.
Last update on 2026-06-18 / Images from Amazon Product Advertising API
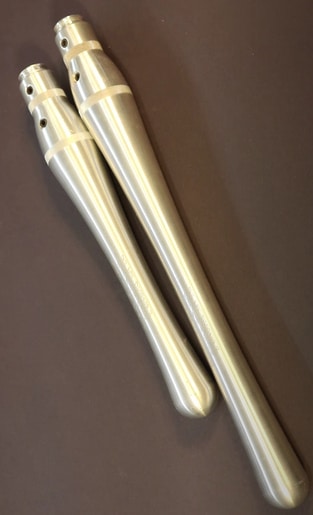
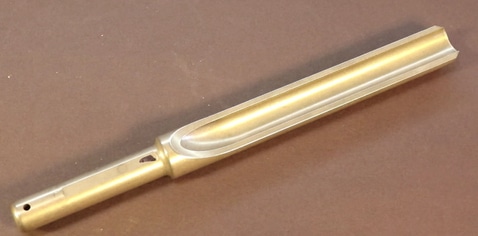
This particular 1- ¼“ tool from “Carter and Son Tools” is the most unique and one of the best Roughing gouge I have used so far.
If you want a lifetime quality tool that will stay sharp all the time, then try using carter and son tools. Don’t fall for the number of reviews as amazon recently added this tool to their store. But they are the best in the business.
The aluminium handle is so well built that you will immediately feel the quality of the leverage the moment you pick up the gouge in your hand.
Moreover, you can adjust the handle by swapping to a smaller one for more maneuverability. They have both 12″ and 16″ handles.
The blades are made of strong m42 high-speed steel. Which will stay about 5 times sharper than any other regular m2 HSS Gouges.
Every tool from Carter & Son is seriously razor-sharp. Besides the 10% cobalt makes the sharpness more sustainable ever than before. So, they are significantly more durable than the traditional m2 HSS.
You may have seen that normally the turning tools come dull out of the set. You need to sharpen them well before start using them. I am talking about any regular style chisels and gouges.
But you can start turning with Carter & Son tools instantly. They are razor-sharp right out of the box. And for maximum sustainability, you can spend more time on the lathe rather than on the grinder.
Another thing to note about the benefit of less sharpening is that you are grinding less of the steel away with each sharpening. Which again ensures the long-lasting sharpening facility like the carbide turning tools.
M42 Steel will even outclass the carbon steel tools. One of the exciting facts for me is the strong aluminium round shank with an aluminium handle. Unlike the regular roughing gouge that has a comparatively weaker tang and wooden handle.
Yes, you can surely use the other tools I mentioned like- The Sorby, Crown, Hurricane and they all are pretty good, but definitely not as this one. The price is quite higher than the other regular m2 steel gouges but that’s obvious.
Lastly, I would say that great tools are the key to success in the woodturning business. So, I strongly recommend using particular roughing gouge from Carter and Son tools.
Spindle Roughing Gouge vs regular spindle Gouge
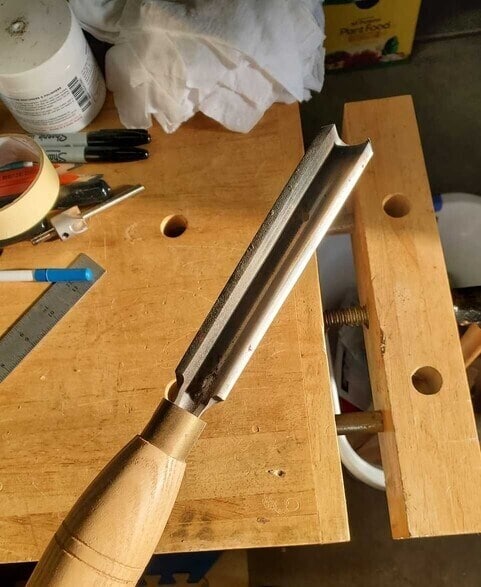
The spindle roughing gouge is a deep u-shaped tool for roughing out the face grain. They are not as flatter as the regular spindle gouge.
In general, the appearance will let you know the roughing gouge has a more pronounced flute. It also generally has thicker steel on the side as opposed to a regular spindle gouge. Which most of the time has a shallower flute.
DON’T use a spindle roughing gouge on any part of the bowl.
However, you can use a good quality spindle gouge on bowl work with no problem. Because the tang on a good quality spindle gouge is the same size as the tang on the comparable bowl gouge from the same maker.
Bowls are usually made from wood mounted 90 degrees off from above (which is called “face” turnings). There are “bottom feeders” gouges, that work very well for the bottoms of the insides of bowls.
Check my post about the differences between bowl gouge and spindle gouge here.
How to start roughing with a spindle roughing gouge?
A good practice method is called the ABCs or the “ankle bevel cut” to help you use a traditional woodturning bevel cutting tool.
I’m not sure the origin of this practice, but it is an excellent method to use, and it will help you remember when you’re first starting.
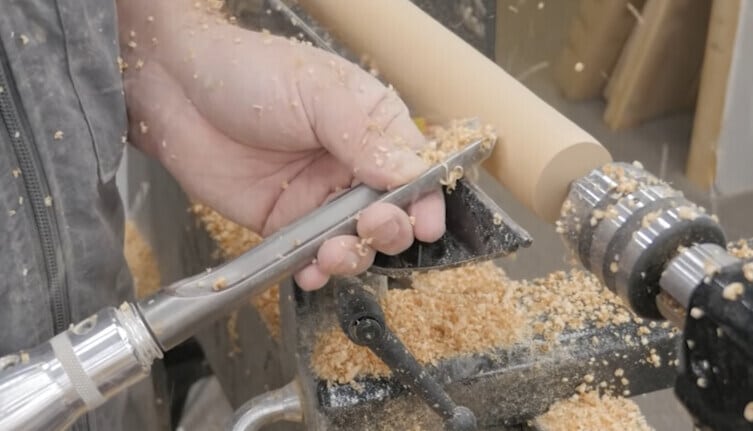
So, you start by anchoring your tool to the tool rest. Always keep the tool shaft anchor to the tool rest at all times, or bad things can happen.
As you bring up your roughing gouge tool handle, your tool cutting edge will come down, and you will start to ride the bevel heel and it will bounce around a bit.
This is okay because the wood is usually square at this point and not round. As the tip comes down and the heel is bouncing around, bringing the tool farther down in the handle up.
Eventually, the tip will start cutting the wood, and the bevel will be riding the wood. And this is the ABCs- the anchor, the bevel, and the cut.
What is the best size for a roughing gouge?
Roughing Gouge or the Spindle roughing gouge comes in different sizes, lengths, steel thicknesses, different Steel’s. It also can have varying profiles, bevels, tip shapes, etc. I mean, it just depends on what you like to turn and what you prefer to use.
There are different sizes of spindle roughing gouge you might see in the market. But to be honest, there is no ideal roughing gouge size. It depends on what you are turning and how comfortably it fits your hand.

So, I would say that the larger, the better. If you are a pen turner or turning somewhat regular size ornaments and stuff, you might do well with a ¾”. Normally a ¾” spindle roughing gouge satisfies most spindle turning.
However, you will feel shorter if you try a larger piece like a baseball bat or mallet handles kind of stuff. So, a flute size of 1” and more will always keep you on the safer side when buying one. That way the “wings” are far away from touching the blank.
Even 2″ flute gouges are also popular for their gigantic outlook. So, if you are working on some large spindles, you can get a 2″ for you.
But always remember, it’s not about the size it’s about how you’re using it.
Types of cut you can do with Roughing Gouges
There are several different types of basic cuts you can make with a spindle roughing gouge. And I reiterate not on cross-grain wood.
The cutting edge in the angle and the tang of these tools will dig into the end grain. And not just on bowl blanks but any project with cross-grain orientation.
For example, a bottle stopper is mounted in a cross-grain fashion. The cuts should be right on centerline or just a hair above it.
Why should you not use it on cross-grain?
Never use a spindle roughing gouge on cross-grain as in a bowl blank. You only use a spindle roughing gouge on spindle work or grain that is parallel with the bed of your lathe.
This has to deal with safety concerns or possible injury as the tangs on these tools are generally thin and can break very easily if you were to get a catch.
Also, the basic geometry of the spindle roughing gouge comes into play as in the bevel angle generally around 45 degrees. The flute shape and/or tool size all of these can add up to trouble on cross-grain applications.
How to start cutting using roughing gouge?
The first cut is should not be started from the middle of the workpiece. You don’t want to jam it in the center because this can cause large pieces to our splinters to come off.
You can start an inch from the end and take it from there.
If you start from right to left (at the very edge) and going into the end grain, big chunks can fly off and you can lose control of your tool if the cutting edge when it first hits the wood is not supported.
However, you can use the spindle roughing gouge this way but you really should be more experienced and have a really good feel for the tool before you start using it that way.
Once both ends are somewhat round, do a long transverse cut to kind of smooth out the middle. you can use your tool on top of the wood piece to see if it’s round or not. You don’t have to stop your lathe.
Then once it is somewhat round I’ll use a planing cut from one side to the next really slow to get a nice fine finish.
As the piece becomes round and smaller, you’ll want to keep moving your tool rest in closer as close as you can, based on your tool in the bevel angle and what’s comfortable for you.
This goes for basically any tool that you’re going to use not just to spin a roughing gouge. Make sure the tool rest is as close to the piece as possible.
Can you rough out a spindle without a roughing gouge?
I know some Turner’s that will only use a skew to rough out their spindle blanks and they don’t even own spindle roughing gouges. and that’s fine too.
I use a skew also to rough out spindle blanks but I also do love using the spindle roughing gouge. It really does make quick work of turning square spindle blanks around.
And I like using the spindle roughing gouges on spatulas and three-sided spindle work. Work that has on and off-air turning. where there’s air then there’s wood.
How to hold the spindle roughing gouge?
Another important thing to remember is how you hold the spindle roughing gouge and how you’re standing or sitting at the lathe.
For spindle turning when I’m doing a planing cut, I’ll use an underhand and my index finger will be up against the tool rest and my thumb will be anchored on the other side of the gouge.
Opposed to overhand which I’ll use for the roughing and the transverse cuts with my thumb above the tool.
Please see this attached video, it’s one of my favourite tutorials on how to use a roughing gouge.
What angles you should cut your roughing gouge?
In all honesty, the angle is not that important. It’s actually the consistency so that you get comfortable with whatever angle you decide you like.
There is virtually never “only” one way. The angle of a roughing gouge is not critical. The sharpness of chisels is always critical.
However, I prefer a steep angle on my roughing gouge, and I typically grind a bit off-centre because a rarely face the cutting edge straight into the wood. I angle off slightly so I don’t bathe in shavings and chips when initially starting to rough in a piece, whether spindle or bowl.
It typically is the tool that will take the most abuse due to banging away from an uneven start or from rounding off a square. I typically go about 60° to 65° on mine.
The angle of the grind being off a degree or two won’t matter much. But use what works for you. Something between 40 and 60.
The more acute the angle the more brittle and aggressive the less acute (note that technically obtuse means more than 90 so I did not use that term), the stronger the edge and more forgiving.
A five-degree difference will make a little more difference on something like a bowl or spindle gouge, but not much. The key is to be as consistent as you can so that the muscle memory you develop working with a particular grind is still helpful after you sharpen.
But getting wrapped around the axle about 48 degrees versus 53 degrees? Silly and unnecessary.
Rough that spindle out
That’s all for today. I hope I touched on a majority of the basics of using and buying the best roughing gouge you possibly could.
Do remember not to use a spindle roughing gouge on cross-grain projects. You can use a bowl gouge also to rough out your logs but it’ll take much longer to finish roughing.
It is because the size of the flute as gouges for spindle roughing is very wide and thus can take a wide portion at a time.
And lastly, go for the carter and son tools that I recommended, you will have no buyers remorse. Good luck!